Maximum online editor file which we see in Google Blogger Blog aren’t approved direct code from Adsense for the live ad show. Then we need to go to Google Adsense HTML Encoder/Parser Tool for encoding our ad codes. And then received it in Blogger HTML area.
There are so many blogs, tools are the Internet for encoding or parse HTML codes. But in this post, I shall go to give an idea or some rules for making a tool in your website for encode AdSense ad.
Actually, HTML encoder tools is an online tool that allows users to escape HTML characters (<, >, &, ” etc.) into XML forms to ensure proper display of HTML Codes. It is one of the most familiar tools in the online for encoder or parser Adsense code and turns HTML into XML.
Read Also:
1. Add Adsense Ads Middle of First Two Post in Blogger Blog
2. Ніghеst Gооglе Аdsеnsе Еаrnеrs In The World
3. How To Add Adsense Ads In The Middle Or Anyplace Inside Blogger Posts
4. Top 55 Highest Paying Adsense Keywords for Google
Now we cover up how to make Google Adsense code parser tool in blogger blog page area. Let’s see hot to make it with following some steps and adding some codes in page area and blogger dashboard.
Methods of HTML Encoder/Parser Tool in Blogger
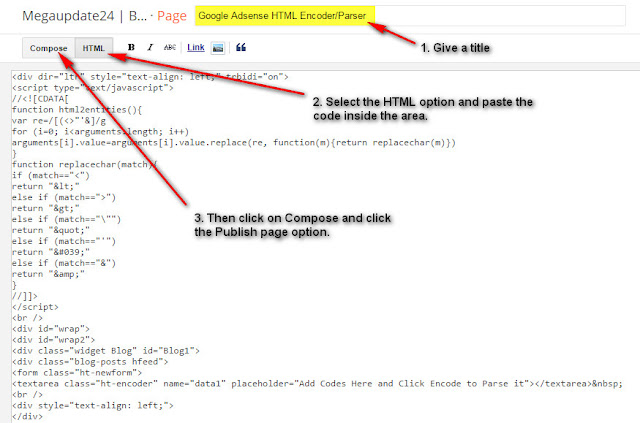
- First, you will need to go Blogger Dashboard with (Sing In) your blogger account.
- Then click on the Page option and create a New Page.
- Now give a Title>> HTML>> Paste The Code Inside The Area from below and Click On Compose. Then Click on Publish Button.
Codes are appearing:
<div dir=”ltr” style=”text-align: left;” trbidi=”on”>
<script type=”text/javascript”>
//<![CDATA[
function html2entities(){
var re=/[(<>”‘&]/g
for (i=0; i<arguments.length; i++)
arguments[i].value=arguments[i].value.replace(re, function(m){return replacechar(m)})
}
function replacechar(match){
if (match==”<“)
return “<”
else if (match==”>”)
return “>”
else if (match==”””)
return “"”
else if (match==”‘”)
return “'”
else if (match==”&”)
return “&”
}
//]]>
</script>
<br />
<div id=”wrap”>
<div id=”wrap2″>
<div class=”widget Blog” id=”Blog1″>
<div class=”blog-posts hfeed”>
<form class=”ht-newform”>
<textarea class=”ht-encoder” name=”data1″ placeholder=”Add Codes Here and Click Encode to Parse it”></textarea>
<br />
<div style=”text-align: left;”>
</div>
<div style=”text-align: left;”>
<input class=”ht2″ onclick=”html2entities(this.form.data1)” onmouseout=”this.className=’ht2′” onmouseover=”this.className=’ht2 ht2hov'” type=”button” value=”Encode” /> <input class=”ht2″ onmouseout=”this.className=’ht2′” onmouseover=”this.className=’ht2 ht2hov'” type=”reset” value=”Clear All” /> </div>
</form>
</div>
</div>
</div>
</div>
</div>
Now you are half of done and follow these steps for successfully create an HTML Encoder or Parser Tool in BlogSpot blog.
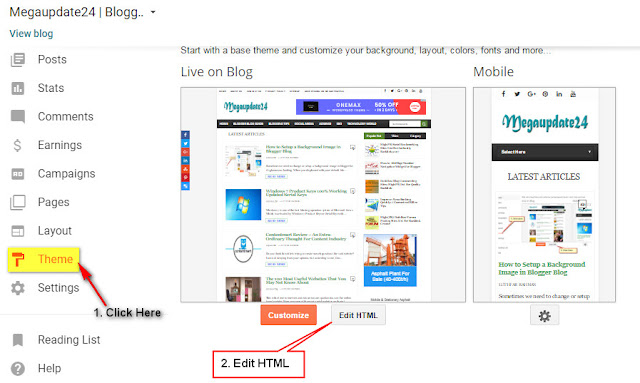
- In the second steps. You click on Theme>> Edit HTML.
- Now click on the code area and press Ctrl+F for finding this code ]]></b:skin> for adding CSS Codes.
- Now copies the CSS codes from below and paste before/above the ]]></b:skin> position.
.ht-newform {
width: 400px;
margin-left: 100px;
}
.ht-encoder {
width: 400px !important;
height: 180px !important;
margin-left: 10%;
margin: 5px auto;
padding: 2px 2px 2px 6px;
font-family:Arial, sans-serif !important;
font-size: 18px;
color:#808080;
border:1px solid #ccc;
-webkit-border-radius: 4px;
-moz-border-radius: 4px;
border-radius: 4px;
-webkit-box-shadow: rgba(0, 0, 0, 0.247059) 0px 1px 3px inset, #f5f5f5 0px 1px 0px;
box-shadow: rgba(0, 0, 0, 0.247059) 0px 1px 3px inset, #f5f5f5 0px 1px 0px;
-webkit-box-shadow: inset 0 1px 2px rgba(0,0,0,0.2), 0 0 0 6px #e0e0e0;
-moz-box-shadow: inset 0 1px 2px rgba(0,0,0,0.2), 0 0 0 6px #e0e0e0;
box-shadow: inset 0 1px 2px rgba(0,0,0,0.2), 0 0 0 6px #e0e0e0;
-webkit-transition: all 0.4s linear;
-moz-transition: all 0.4s linear;
transition: all 0.4s linear;
}
.ht-encoder:focus {
width: 100%;
color: #666;
border: 1px solid #808080;
-webkit-box-shadow: inset 0 1px 2px #808080, 0 0 0 6px #808080;
-moz-box-shadow: inset 0 1px 2px #808080, 0 0 0 6px #808080;
box-shadow: inset 0 1px 2px #808080, 0 0 0 6px #808080;
-webkit-transition: all 0.4s linear;
-moz-transition: all 0.4s linear;
transition: all 0.4s linear;
}
.ht-encoder:hover{
border: 1px solid #c0c0c0;
-webkit-box-shadow: inset 0 1px 2px #c0c0c0, 0 0 0 6px #c0c0c0;
-moz-box-shadow: inset 0 1px 2px rgba(0,0,0,0.1), 0 0 0 6px #f0f0f0;
box-shadow: inset 0 1px 2px #c0c0c0, 0 0 0 6px #c0c0c0;
-webkit-transition: all 0.4s linear;
-moz-transition: all 0.4s linear;
transition: all 0.4s linear;
}
.ht3 {
color:#000;
font: normal 12px sans-serif, verdana;
border:1px dotted #67A7E3;
background:#C9E4FF;
}
.ht3:hover {
color:#289728;
font: normal 12px sans-serif, verdana;
border-left:5px solid #289728;
background:#fff;
}
.ht4 {
color:#3C3C3C;
font: normal 12px sans-serif, arial;
border:1px dotted #67A7E3;
background:#C9E4FF;
margin-bottom:4px;
}
.ht4:hover {
color:#289728;
border:1px solid #289728;
background:#fff;
}
.ht2 {margin-bottom: 2px; float: right;}
.ht2 {
padding: 12px 12px;
background: #f4f4f4;
background: -moz-linear-gradient(top, #f4f4f4 0%, #f1f1f1 100%);
background: -webkit-gradient(linear, left top, left bottom, color-stop(0%,#f4f4f4), color-stop(100%,#f1f1f1));
background: -webkit-linear-gradient(top, #f4f4f4 0%,#f1f1f1 100%);
background: -o-linear-gradient(top, #f4f4f4 0%,#f1f1f1 100%);
background: -ms-linear-gradient(top, #f4f4f4 0%,#f1f1f1 100%);
background: linear-gradient(top, #f4f4f4 0%,#f1f1f1 100%);
filter: progid:DXImageTransform.Microsoft.gradient( startColorstr=’#f4f4f4′, endColorstr=’#f1f1f1′,GradientType=0 );
-moz-box-shadow: 0 1px 1px #ddd inset, 0 2px 0 #fff;
-webkit-box-shadow: 0 1px 1px #ddd inset, 0 2px 0 #fff;
box-shadow: 0 1px 1px #ddd inset, 0 2px 0 #fff;
color: #808080;
text-decoration: none;
cursor: pointer;
display: inline-block;
text-align: center;
font-weight: bold;
font-family: Arial, Helvetica, sans-serif;
text-transform:uppercase;
text-shadow: 0px 1px 1px rgba(255,255,255,1);
line-height: 1;
font-size:12px;
border: solid 1px #bbb;
border-radius: 2px;
-webkit-border-radius: 2px;
-moz-border-radius: 2px;
}
.ht2:hover {
color: #333;
border-color: #999;
-moz-box-shadow: 0 2px 0 rgba(0, 0, 0, 0.2);
-webkit-box-shadow:0 2px 5px rgba(0, 0, 0, 0.2);
box-shadow: 0 1px 2px rgba(0, 0, 0, 0.15);
}
.ht2:active {
outline: 0;
border-color: #aaa;
color: #FF0000;
-moz-box-shadow: 0 4px 4px #bbb inset;
-webkit-box-shadow: 0 4px 4px #bbb inset;
box-shadow: 0 4px 4px #bbb inset;
}
.ht2 a:active {
color: #FF0000;
-moz-box-shadow: 0 4px 4px #bbb inset;
-webkit-box-shadow: 0 4px 4px #bbb inset;
box-shadow: 0 4px 4px #bbb inset;
}
- Click on the Save Theme option and you are done by adding HTML Encoder Tool in Blogger Blog Page.
- Now view the page which you created and start encoding your HTML code to XML.
Hope so enjoy this post and successfully done by adding parser tool to blogger page. If face any trouble about this post. Care to ask me via the comment section. I will be committed that try to help you in solving your problem. Help me with sharing this on social media for reach more people.

