HTML Sitemaps vs XML Sitemaps
How To Create Sitemap Page In Blogger Blog Step By Step
- First, you have to Backup Your Site Of any changes.
- Secondly, need to add the CSS codes for making your sitemap look winsome. Go to Blogger Dashboard>> Theme>> Edit HTML.
- Then click in the code area and find out ]]></b:skin> tag. Just above it paste the following code which I provide below. You cal also customize the colour code for matching HTML Sitemap page with your template.
/* Sitemap plugin By MyBloggerLab */
#bp_toc {
color: #666;
margin: 0 auto;
padding: 0;
border: 1px solid #d2d2d2;
float: left;
width: 100%;
}
span.toc-note {
display: none;
}
#bp_toc tr:nth-child(2n) {
background: #f5f5f5;
}
td.toc-entry-col1 a {
font-weight: bold;
font-size: 14px;
}
.toc-header-col1,
.toc-header-col2,
.toc-header-col3 {
background:#9E9E9E;
}
.toc-header-col1 {
padding: 10px;
width: 250px;
}
.toc-header-col2 {
padding: 10px;
width: 75px;
}
.toc-header-col3 {
padding: 10px;
width: 125px;
}
.toc-header-col1 a:link,
.toc-header-col1 a:visited,
.toc-header-col2 a:link,
.toc-header-col2 a:visited,
.toc-header-col3 a:link,
.toc-header-col3 a:visited {
font-size: 13px;
text-decoration: none;
color: #fff;
font-weight: 700;
letter-spacing: 0.5px;
}
.toc-header-col1 a:hover,
.toc-header-col2 a:hover,
.toc-header-col3 a:hover {
text-decoration: none;
}
.toc-entry-col1,
.toc-entry-col2,
.toc-entry-col3 {
padding: 5px;
padding-left: 5px;
font-size: 12px;
}
.toc-entry-col1 a,
.toc-entry-col2 a,
.toc-entry-col3 a {
color: #666;
font-size: 13px;
text-decoration: none
}
.toc-entry-col1 a:hover,
.toc-entry-col2 a:hover,
.toc-entry-col3 a:hover {
text-decoration:underline;
}
#bp_toc table {
width: 100%;
margin: 0 auto;
counter-reset: rowNumber;
}
.toc-entry-col1 {
counter-increment: rowNumber;
}
#bp_toc table tr td.toc-entry-col1:first-child::before {
content: counter(rowNumber);
min-width: 1em;
min-height: 3em;
float: left;
border-right: 1px solid #fff;
text-align: center;
padding: 0px 11px 1px 6px;
margin-right: 15px;
}
td.toc-entry-col2 {
text-align: center;
}
- When everything is done, press Save Template button which you find out the top of your screen. First steps are done, now forward for the second.
Second Steps For Html Sitemap Page In Blogger Is
- Now create a new page from Page Menu where you display your sitemap.
- Process is Go to Blogger>> Page>> New Page>>. In the blogger page editor area, select HTML tab and paste the following code in the HTML code editor.
<div id=”bp_toc”>
</div>
<script src=’http://mybloggerlab.com/js/sitemap.js’ type=”text/javascript”></script>
<script src=”/feeds/posts/summary?alt=json-in-script&max-results=9999&callback=loadtoc” type=”text/javascript”></script>
- After pasting the code you should write a title of your page by the name of “Sitemap”. Also, you can make your comment section disabled if you wish.
- When everything is done pressing Publish Button and visit your sitemap page with nice looking and you are done.
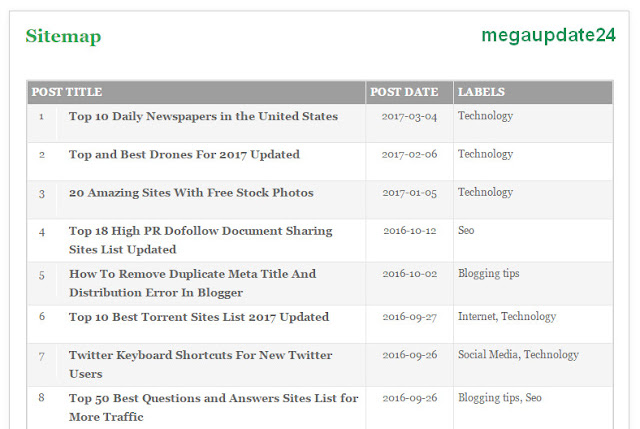
- As a simple looking, it looks like below without any colour edit.
Now I hope this post tech you for a proper guideline to add an HTML Sitemap page in Blogger Blog. If you have any question don’t forget to ask me via comment and if you like it please share it on the social media.

