Read Also:
1. How to Add an HTML Sitemap Page in Blogger Blog
2.How to Create Error 404 Not Found Page In Blogger
I won’t secure your site manually but in this post, I give you an easy and trusted overview of how HTTP is obligated for the security of user like you and me as a blogger. Also, I will be showing how to enable HTTPS in your BlogSpot blog.
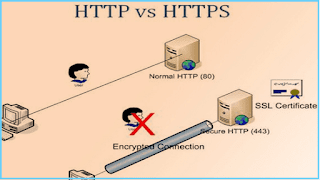
HTTP VS HTTPS
Most of newbie blogger don’t know what is SSL certificate. Http(s) secure is called SSL certificate. Elaboration is:
HTTP (Hyper-Text Transfer Protocol) S (secure)
Also, they are enabled for the scan your username and password. On the other site when you use HTTPS for your website. The transmitted data and information is secured.
That’s why all e-commerce and professionals business persons use HTTPS from the first day when the launch of their website on the web.
Google always a powerful search engine and Google products are always the best. Blogspot blogger blog is one of them. Every professional blogger launched a blog at first Blogspot blog which I know from them even me.
Google gives a lot of resource for their user, as like Gmail, Blogger, Google Drive, Google search, and others.
Google has almost 1500 plus products for easier our daily technology life. From HTTP to HTTPS freely possess one of them.
How To Enable HTTPS In Your Free Blogspot Blog
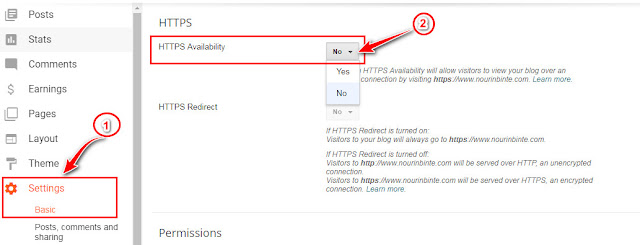
- Login Your Blogger Dashboard
- Scrolling mouse pointer and click on the Settings>>
- Basic >> then enable HTTPS from the right side like below image.
- And you are done.
This is Second Updated:
I promised that if Google gives a change to enable https blogger custom domain. Then I will update this post for all of you newbie blogger! So, now the time is present.
Google SSL Certificate is free for all blogger custom domain user! It’s may unbelievable to you, lol. But it’s right now. In this second part, I will show you how to enable https in blogger custom domain.
Enable HTTPS In Blogger Custom Domain
First, as well as you have to log in your blogger account and go to settings. Then follow the screenshot.
Now click on Basic and click HTTPS Availability option for the turn to yes.
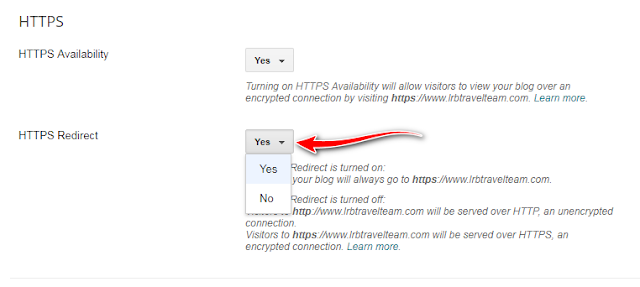
Secondly, reload the webpage you noticed that your first option is done. Now the part is 2nd step HTTPS Redirect. This part takes time to visible after finished first.
So, wait a couple of minutes or longer. Then reload your browser tab again you can follow this is visible now and turn into Yes form No.
Now reload your browser again and click view blog. You are done and you look your custom domain is visible with HTTPS in the browser! If it takes time don’t worry. After five or ten minutes it will automatically redirect.


